

Home / Setup
01 SimHub setup guide
Everything, in
about ten
minutes.
Last updated 4 August 2026 · checked against SimHub 9.11.22
Every oesimracing display connects over USB-C and is driven by SimHub, which is free Windows software.
The displays ship pre-flashed, so there is nothing to solder and no firmware to build — setup is install SimHub, plug the display in, enable your game, and load the profile for your product. It takes about ten minutes. If the lights come on but never respond to anything, the cause is almost always that the game is not ticked in SimHub or that SimHub is looking at the wrong COM port.
02 What is SimHub?
SimHub is the free, community-standard PC software that powers sim racing dashboards, rev lights, gear indicators and motion hardware. It reads live data from your game - revs, gear, speed, flags - and sends it to your hardware. Every oesimracing display is driven by SimHub, and it works with 100+ games including Assetto Corsa, iRacing, the F1 series, EA Sports WRC and DiRT Rally. This guide covers how to download and install SimHub, how to connect and use it, and the full setup for each product.
03 How to install SimHub
The same first steps for every oesimracing display - you’ll only need to do this once.
Download SimHub
SimHub is the free software that drives your display. Go to simhubdash.com, open the Downloads section and download the latest version.
Open simhubdash.com →Extract and run the installer
Unzip the file you downloaded, then open setup.exe inside the extracted folder.
Get past the Windows warning
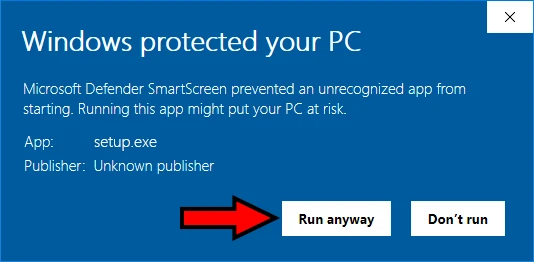
When you run setup.exe, Windows may show a “Windows protected your PC” message. Click More info, then Run anyway to continue.
Finish installation and game setup
Work through the installer, then follow SimHub’s guided setup and select the games you have installed so it can read live data from them.
04 Connect your display over USB-C
Also the same for every product - get SimHub talking to your hardware before you configure it.
Connect your display
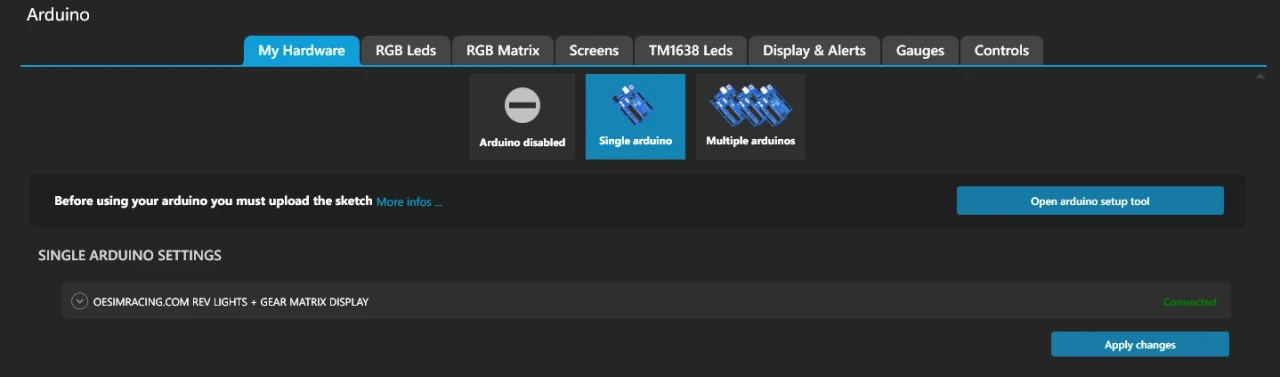
Plug your oesimracing display into a USB port. In SimHub, open the Arduino tab, select the My Hardware sub-tab and choose Single arduino. Wait a moment and the port will show as Connected (e.g. COM8) - your display is now talking to SimHub.
Check your scan settings
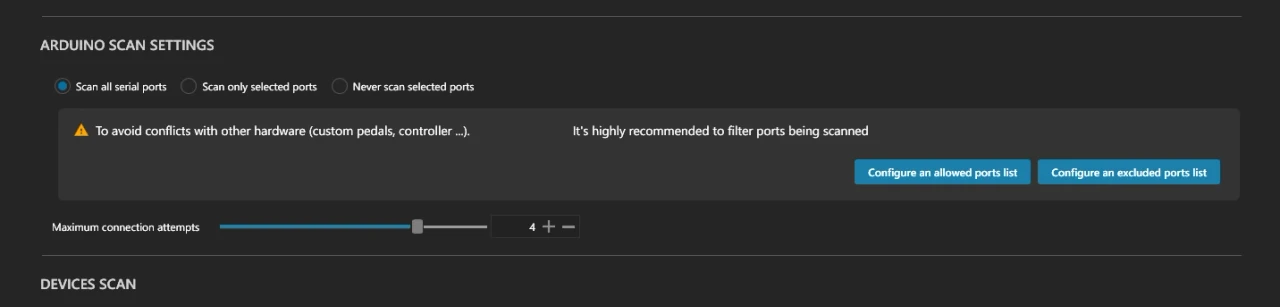
Set your Arduino scan settings to match the ones shown below, then click Apply. SimHub will automatically detect your display and connect to its LEDs.
Any problems? Feel free to contact us.
05 How to use SimHub
Once SimHub is installed and your display is connected, it mostly runs itself. Keep SimHub open in the background while you play and it automatically reads live data from any supported game you launch - revs, gear, speed, flags - and sends it to your lights. You set your colours, effects and layouts once per product in the sections below, and those settings save to the device, so it just works every time you race. There’s nothing to launch or reconfigure each session.
The steps above get any display connected. Now pick your product for its specific settings.
06 Rev Gauge Shift Lights setup
View the Rev Gauge Shift Lights →
The Rev Gauge is a 16-LED shift-light bar - here’s how to set up its rev lights.
Set up your rev lights
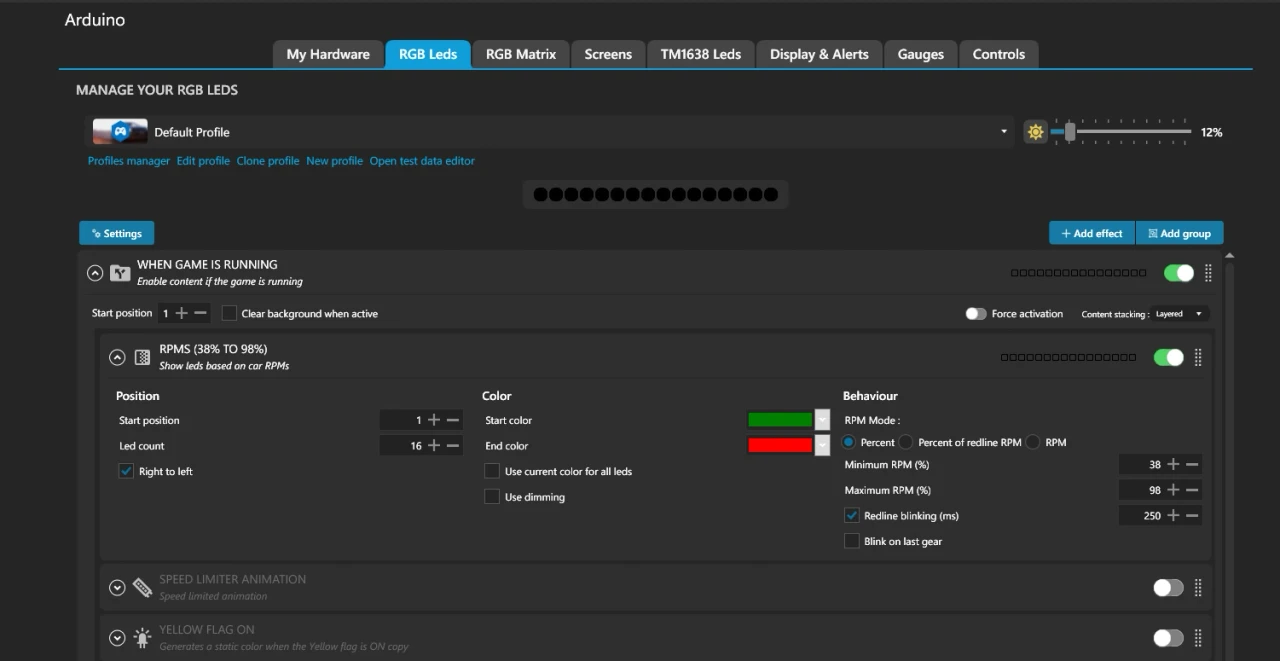
Open the RGB Leds tab. Set Led count to 16, then pick your start and end colours and how the LEDs react to revs. Tick Right to left if your lights fill the wrong way, and use the brightness slider at the top right to set the intensity. Feel free to click the “Add effect” button and experiment with different functions - e.g. flag colours, or airspeed for flight sim games.
Race
Keep SimHub running in the background and connected to the game you’re playing - your rev lights will now react live to what’s happening on track.
07 Gear Indicator + Shift Lights setup
View the Gear Indicator + Shift Lights → Or the Fanatec-mount version →
Same setup whether you have the desk-stand or the Fanatec-mount version - the electronics are identical. It’s the shift-light bar plus a gear-number matrix, so there are two things to configure.
Set up your shift lights
Open the RGB Leds tab, set Led count to 16, and choose your start/end colours and how the LEDs react to revs - exactly as for the Rev Gauge above. Tick Right to left if they fill the wrong way and set the brightness at the top right.
Set up the gear matrix
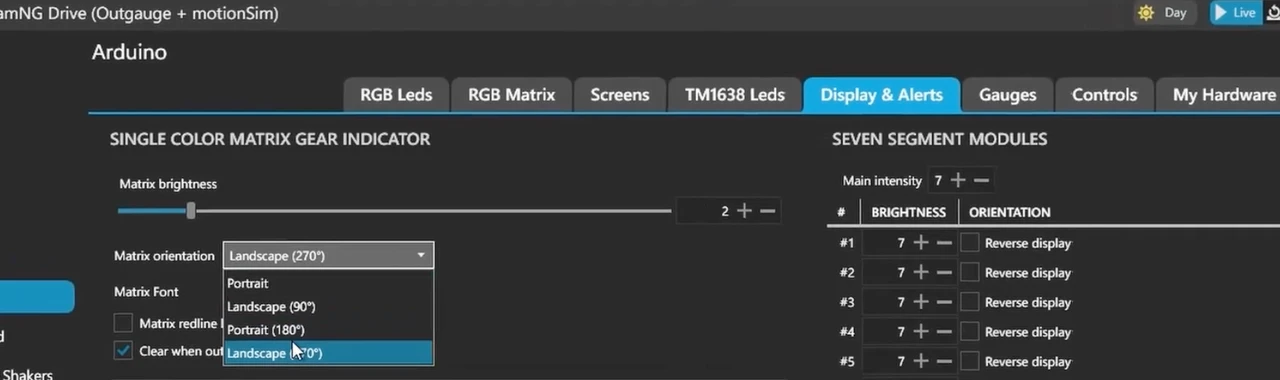
Open the Display & Alerts tab to configure the gear number. Choose your preferred font and tick Clear when out of game. Turn on Matrix redline blink if you’d like the gear to flash on the rev limiter, and use Matrix brightness to set how bright the number is.
Race
Keep SimHub running in the background - you’ll now see your revs and current gear update live as you drive.
08 iFlag: GT Edition setup
The iFlag is an 8x8 RGB matrix that does three jobs on one panel: live marshal flags, a large gear number, and a blind-spot warning. It’s configured on SimHub’s RGB Matrix tab.
Open the RGB Matrix tab
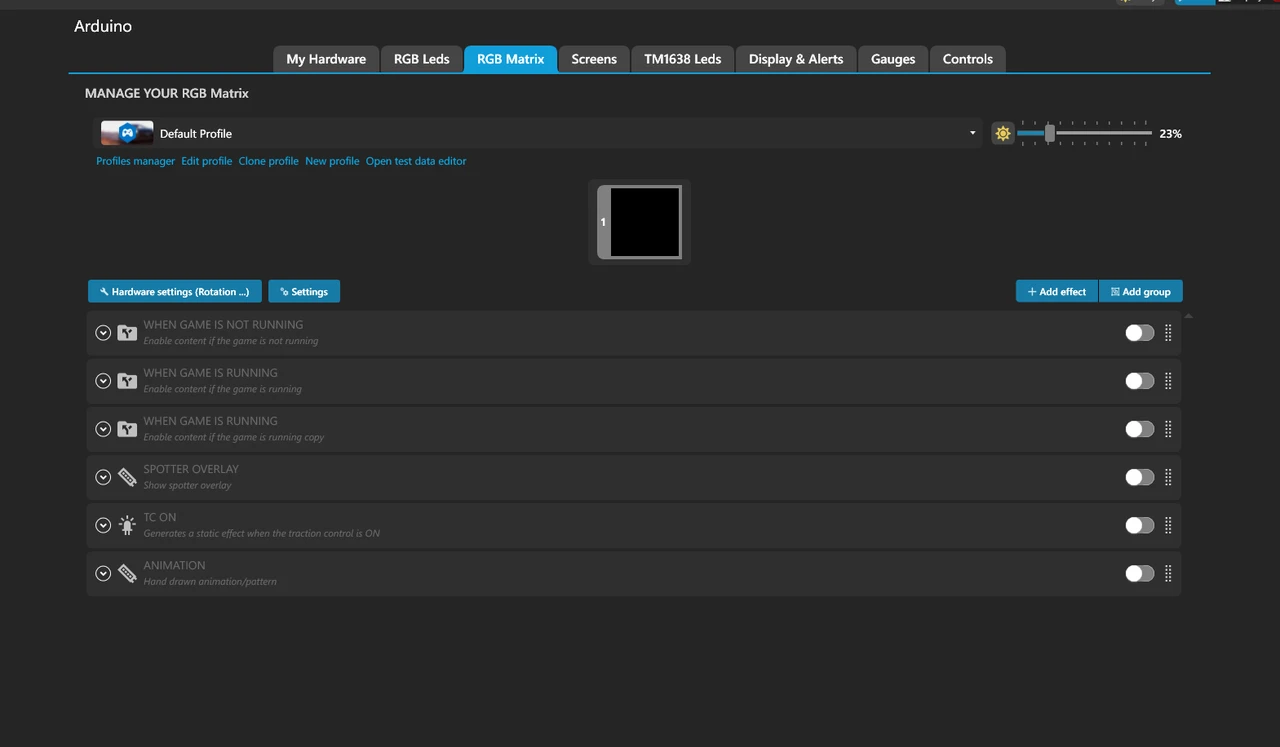
In SimHub, open the RGB Matrix tab - this is where the iFlag’s 8x8 panel is configured. You’ll see the matrix preview, the Hardware settings and Settings buttons, and the list of effect groups.
Open Hardware settings
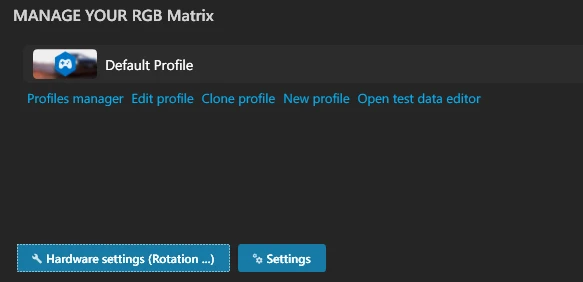
Click the Hardware settings (Rotation …) button, just under the profile name.
Set the rotation to Landscape (90°)
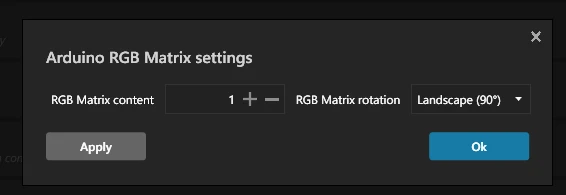
In the Arduino RGB Matrix settings box, set RGB Matrix rotation to Landscape (90°), click Apply, then Ok. This orients the panel the right way up for the iFlag.
Turn on the “When game is running” group and pick your effects
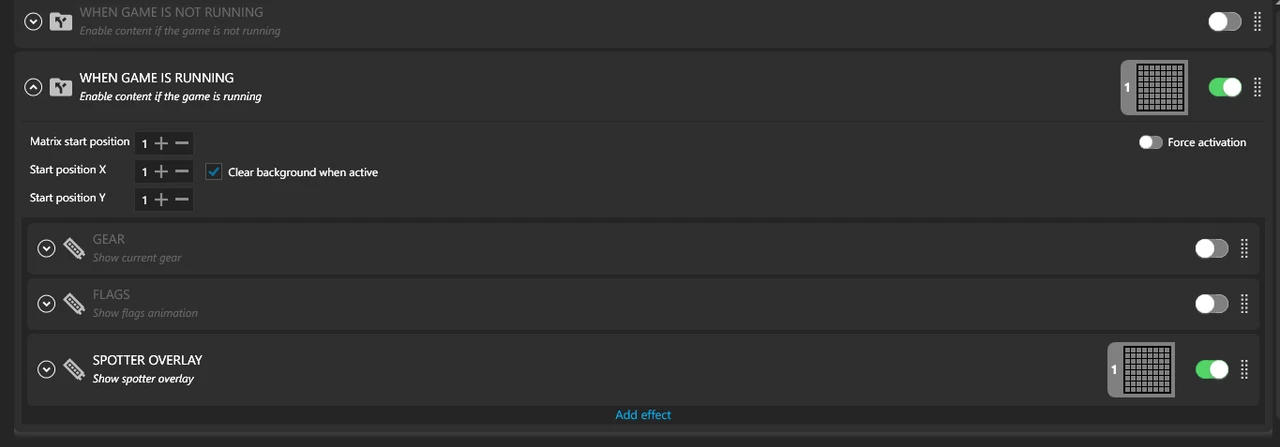
Expand the “When game is running” group and switch it on, then tick Clear background when active. Inside it, enable the effects you want - the iFlag can show your Gear, marshal Flags and a Spotter overlay for blind-spot warnings. Each one is set up below.
Flags
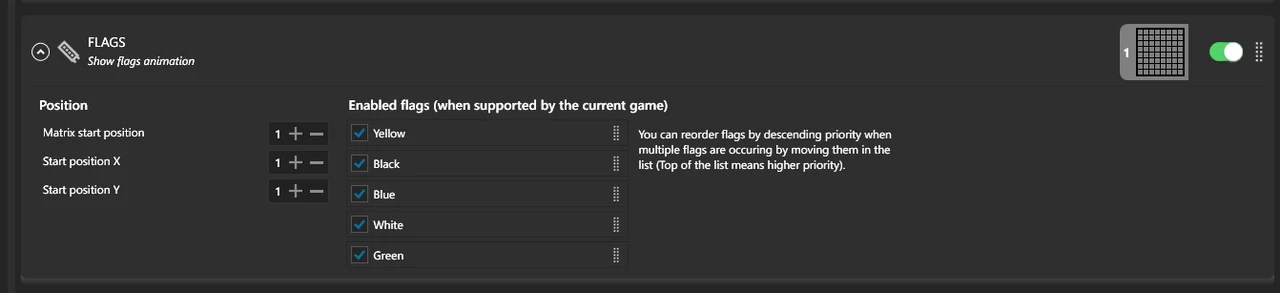
The Flags effect shows live marshal flags. Tick the flags you want enabled (Yellow, Black, Blue, White, Green) and reorder them by priority - the top of the list wins when several occur at once. Flags only appear in games that report them.
Gear
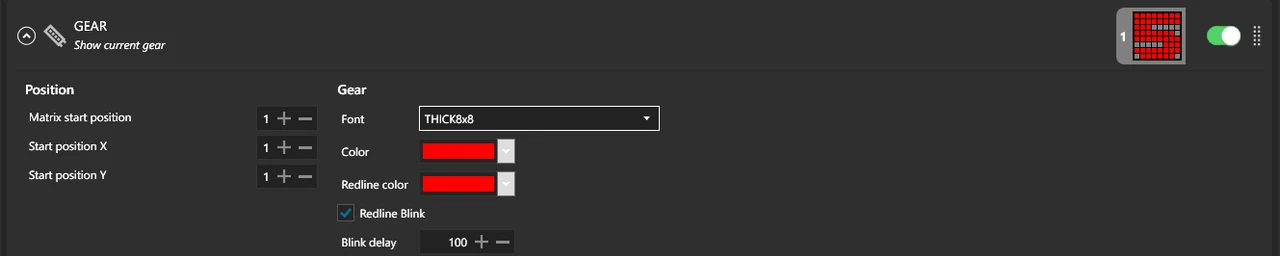
The Gear effect shows your current gear as a large number. Pick a Font (e.g. THICK8x8), choose a Color and Redline color, and turn on Redline Blink if you’d like it to flash on the limiter.
Spotter overlay (blind-spot warning)
The Spotter overlay is the blind-spot warning - it lights up when a car is alongside you. Pick a Style animation (e.g. RightArrowAnimation) and tick Clear background when car is spotted left or right.

Race
Keep SimHub running in the background - flags, your gear and the blind-spot warning will all update live as you drive.
09 Troubleshooting & FAQ
The quick fixes for the things people ask about most.
SimHub doesn’t detect my display
Full page: SimHub isn’t detecting my Arduino →
What USB-C cable do I need?
Full page: devices randomly disconnecting →
Do I need to flash or program anything?
My rev lights fill the wrong way
Full page: shift lights, direction included →
My iFlag is upside down or the wrong way round
Full page: RGB matrix displays, rotation included →
SimHub isn’t reacting to my game
Full page: SimHub isn’t detecting my game →
Does it work on PlayStation or Xbox?
Full page: SimHub on PS5 and Xbox →
10 Profile downloads
Your device ships pre-flashed and ready to race - you won’t normally need these. They’re here only in case you ever need to reflash the SimHub profile, for example for tech support.
Choose the profile that matches your device. In SimHub, import the .tfp via
the profile menu, then re-upload it to your device.
Profile files are served from the live site on this demo.
11 Not got yours yet?
Plugged in and
racing in minutes.
Every oesimracing display plugs in over USB-C and runs on the same SimHub setup you just read - pick one and you’ll be racing in minutes.